Nokia G-240W-B
This guide was developed using a Nokia G-240W-B router (software version 3FE47969AGCA21). It should work for other models in the G series.
Note
There is no single way to do it right. Choose the one best suited for you.
This guide is IPv4 and IPv6 compatible, but it is not mandatory to use IPv6.
Prerequisites
- The
Raspberry Piis using static IP address,IPv4andIPv6as well. This can be a fixed DHCP assignment or configured statically on the Pi itself. - The
ISPprovidesIPv6address, prefix and gateway to the router.
Grab your IPv4 and IPv6 address from your Raspberry Pi
SSH into your Raspberry Pi. A quick ifconfig eth0 (substituting eth0 for the applicable network interface) will get you the address information:
eth0: flags=4163<UP,BROADCAST,RUNNING,MULTICAST>  mtu 1500
    inet 192.168.1.10  netmask 255.255.255.0  broadcast 192.168.1.255
    inet6 2806:103e:1f:2ace:22a1:de1d:e1bf:30dc  prefixlen 64  scopeid0x0<global>
    inet6 2806:103e:1f:2ace:7d21:7337:7817:2fb2  prefixlen 128  scopeid0x0<global>
    inet6 fe80::e6f3:5490:577e:4fed  prefixlen 64  scopeid 0x20<link>
    inet6 fe80::192:168:1:10  prefixlen 64  scopeid 0x20<link>
    ether e4:5f:01:cd:8e:e1  txqueuelen 1000  (Ethernet)
    RX packets 4342  bytes 704995 (688.4 KiB)
    RX errors 0  dropped 0  overruns 0  frame 0
    TX packets 3376  bytes 661707 (646.1 KiB)
    TX errors 0  dropped 0 overruns 0  carrier 0  collisions 0
The relevant lines here are inet 192.168.1.10 netmask 255.255.255.0 and inet6 fe80::192:168:1:10 prefixlen 64
Worth to mention that the IPv6 address that starts with fe80 is the link-local address and it is used in this guide, the other addresses that start with 2806 are the global addresses and they are assigned by the router.
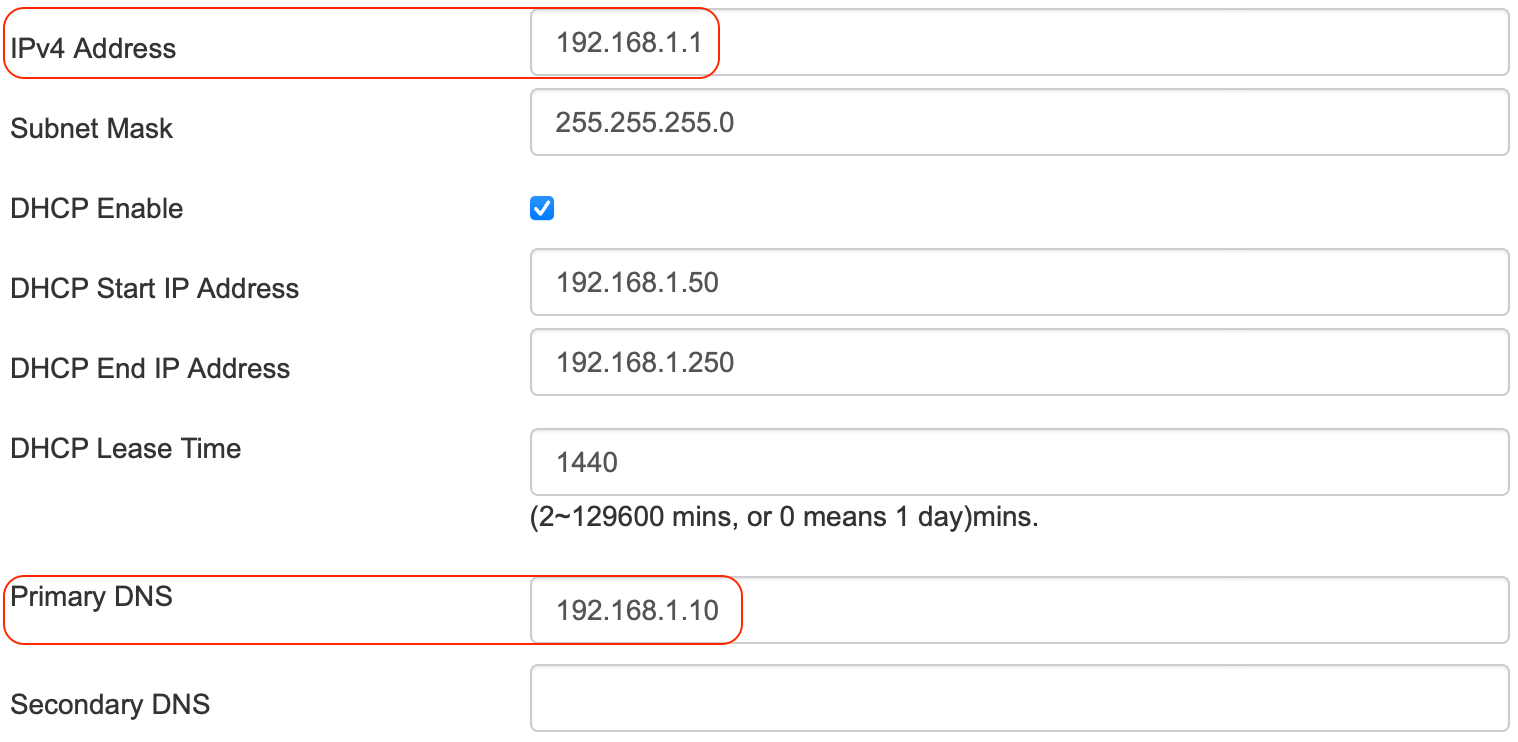
IPv4 configuration
Go to Network --> LAN
- Set
IPv4 addressto the default gateway address,192.168.1.1or192.168.1.254depending on your specific router configuration. - Set
Subnet maskto255.255.255.0 - Set
Primary DNSto192.168.1.10(theIPv4 eth0address) - Set
DHCP Enabled(update IP address range if needed) - Click
Save
All client devices connected to the network should now automatically be configured with a single 192.168.1.x address for the DNS resolution.
IPv6 configuration
Go to Status --> WAN Status IPv6
Take note of the following Link Local IPv6 address (e.g. fe80::1)
In this case the prefix is used to create the static addresses for the eth0 interface. Other dispositives will use the same prefix to create their addresses automatically.

Go to Network --> LAN_IPv6
IPv6 LAN Host Configuration
- Set
DNS Servertostatic - Set
Preferred DNStofe80::192:168:1:10(theIPv6 eth0address) - Set
LAN Prefixto1_LAN_Prefix(theISPprovided prefix) - Set
Enablecheckbox - Click
Save/Apply

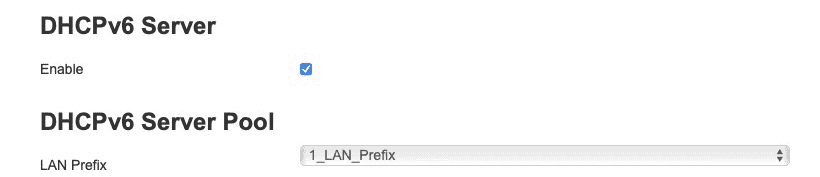
DHCPv6 Server
- Set
Enablecheckbox (this means using ULA addresses) - Click
Save/Apply
DHCPv6 Server Pool
- Set
LAN Prefixto1_LAN_Prefix - Click
Save/Apply
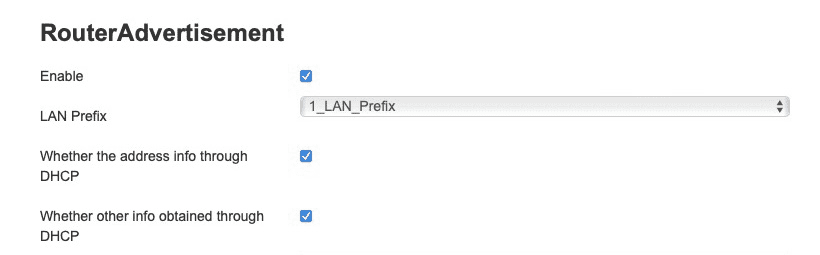
RouterAdvertisement
- Set
Enablecheckbox - Set
LAN Prefixto1_LAN_Prefix(theISPprovided prefix) - Set
Whether the address info through DHCPcheckbox - Set
Whether other info obtained through DHCPcheckbox - Click
Save/Apply
All client devices connected to the network should now automatically be configured with fe80::xxxx:xxxx:xxxx:xxxx router address.