unbound
Pi-hole as All-Around DNS Solution
The problem: Whom can you trust?
Pi-hole includes a caching and forwarding DNS server, now known as FTLDNS. After applying the blocking lists, it forwards requests made by the clients to configured upstream DNS server(s). However, as has been mentioned by several users in the past, this leads to some privacy concerns as it ultimately raises the question: Whom can you trust? Recently, more and more small (and not so small) DNS upstream providers have appeared on the market, advertising free and private DNS service, but how can you know that they keep their promises? Right, you can't.
Furthermore, from the point of an attacker, the DNS servers of larger providers are very worthwhile targets, as they only need to poison one DNS server, but millions of users might be affected. Instead of your bank's actual IP address, you could be sent to a phishing site hosted on some island. This scenario has already happened and it is likely to happen again...
When you operate your own (tiny) recursive DNS server, then the likeliness of getting affected by such an attack is greatly reduced.
What is a recursive DNS server?
The first distinction we have to be aware of is whether a DNS server is authoritative or not. If I'm the authoritative server for, e.g., pi-hole.net, then I know which IP is the correct answer for a query. Recursive name servers, in contrast, resolve any query they receive by consulting the servers authoritative for this query by traversing the domain.
Example: We want to resolve pi-hole.net. On behalf of the client, the recursive DNS server will traverse the path of the domain across the Internet to deliver the answer to the question.
What does this guide provide?
In only a few simple steps, we will describe how to set up your own recursive DNS server. It will run on the same device you're already using for your Pi-hole. There are no additional hardware requirements.
This guide assumes a fairly recent Debian/Ubuntu-based system and will use the maintainer provided packages for installation to make it an incredibly simple process. It assumes only a very basic knowledge of how DNS works.
A standard Pi-hole installation will do it as follows:
- Your client asks the Pi-hole
Who is pi-hole.net? - Your Pi-hole will check its cache and reply if the answer is already known.
- Your Pi-hole will check the blocking lists and reply if the domain is blocked.
- Since neither 2. nor 3. is true in our example, the Pi-hole forwards the request to the configured external upstream DNS server(s).
- Upon receiving the answer, your Pi-hole will reply to your client and tell it the answer to its request.
- Lastly, your Pi-hole will save the answer in its cache to be able to respond faster if any of your clients queries the same domain again.
After you set up your Pi-hole as described in this guide, this procedure changes notably:
- Your client asks the Pi-hole
Who is pi-hole.net? - Your Pi-hole will check its cache and reply if the answer is already known.
- Your Pi-hole will check the blocking lists and reply if the domain is blocked.
- Since neither 2. nor 3. is true in our example, the Pi-hole delegates the request to the (local) recursive DNS resolver.
- Your recursive server will send a query to the DNS root servers: "Who is handling
.net?" - The root server answers with a referral to the TLD servers for
.net. - Your recursive server will send a query to one of the TLD DNS servers for
.net: "Who is handlingpi-hole.net?" - The TLD server answers with a referral to the authoritative name servers for
pi-hole.net. - Your recursive server will send a query to the authoritative name servers: "What is the IP of
pi-hole.net?" - The authoritative server will answer with the IP address of the domain
pi-hole.net. - Your recursive server will send the reply to your Pi-hole which will, in turn, reply to your client and tell it the answer to its request.
- Lastly, your Pi-hole will save the answer in its cache to be able to respond faster if any of your clients queries the same domain again.
You can easily imagine even longer chains for subdomains as the query process continues until your recursive resolver reaches the authoritative server for the zone that contains the queried domain name. It is obvious that the methods are very different and the own recursion is more involved than "just" asking some upstream server. This has benefits and drawbacks:
-
Benefit: Privacy - as you're directly contacting the responsive servers, no server can fully log the exact paths you're going, as e.g. the Google DNS servers will only be asked if you want to visit a Google website, but not if you visit the website of your favorite newspaper, etc.
-
Drawback: Traversing the path may be slow, especially for the first time you visit a website - while the bigger DNS providers always have answers for commonly used domains in their cache, you will have to traverse the path if you visit a page for the first time. The first request to a formerly unknown TLD may take up to a second (or even more if you're also using DNSSEC). Subsequent requests to domains under the same TLD usually complete in
< 0.1s. Fortunately, both your Pi-hole as well as your recursive server will be configured for efficient caching to minimize the number of queries that will actually have to be performed.
Recommended: Test access to root servers
Some ISPs intercept and redirect outbound DNS traffic on port 53 to their own resolvers, without any indication that this is happening. Security or parental filtering software, including the firmware on many consumer-grade and home routers may do the same. Either of these will prevent unbound from reaching the root servers directly, and likely cause it to fail in ways that can be difficult to diagnose.
Before proceeding, it is worth confirming that your device can definitively reach a root server. The following tests use a.root-servers.net at 198.41.0.4, and should be run on the system upon which you intend to install unbound.
-
Test UDP reachability and check for interception. Query
a.root-servers.netdirectly for the root name servers, without requesting recursion:dig @198.41.0.4 . NS +norec +time=3Check the
flags:line in the response. If you are talking directly to a root server, the response will includeaa(Authoritative Answer) which confirms the server is authoritative for the root zone and simultaneously thera(Recursion Available) flag will be absent, as root servers do not offer recursion.e.g.
;; flags: qr aa; QUERY: 1, ANSWER: 13, AUTHORITY: 0, ADDITIONAL: 27If your DNS traffic is being intercepted, the
raflag will be present andaawill most likely be absent, as an ISP resolver or proxy is answering instead of the root server.e.g.
;; flags: qr ra; QUERY: 1, ANSWER: 13, AUTHORITY: 0, ADDITIONAL: 0 -
Test TCP reachability.
unboundrelies on TCP/53 for large DNSSEC responses and for retries:dig @198.41.0.4 . NS +norec +tcp +time=3Some CG-NAT implementations pass UDP DNS traffic unscathed while silently dropping TCP DNS traffic. If step 1 succeeded but this command times out then this will likely cause cryptic
unboundfailures on your network when larger DNS requests are required. If you are reaching the root server, theflags:line will be structurally identical to the previous step. -
Confirm server identity via the
CHAOSclass. Root servers respond toCHAOS(CH) class queries with unique identifiers. Most ISP interception proxies do not handleCHAOSqueries:dig @198.41.0.4 version.bind CH TXT +time=3If you are connecting to the root server directly, the response will be a
TXTrecord containingATLAS.e.g.
version.bind. 0 CH TXT "ATLAS"If your traffic is being intercepted then this command will return a string othert that
ATLASor could time out or returnSERVFAIL. This can happen even if the previous tests appeared to succeed, as proxies generally handle standard query classes correctly. If the first two tests succeed but this one fails then be aware that your DNS traffic is being proxied, including an understanding that DNS reliability and privacy of any unencrypted DNS queries may be effected.
If any of these tests fail, it is not recommended to proceed with installation of unbound as a local recursive resolver before investigating the source of failure (e.g. ISP redirection or proxying of DNS queries, CG-NAT blocking of TCP DNS traffic or security/parental filtering on router) and its successful remediation.
Setting up Pi-hole as a recursive DNS server solution
We will use unbound, a secure open-source recursive DNS server primarily developed by NLnet Labs, VeriSign Inc., Nominet, and Kirei.
The first thing you need to do is to install the recursive DNS resolver:
sudo apt install unbound
If you are installing unbound from a package manager, it should install the root.hints file automatically with the dependency dns-root-data. The root hints will then be automatically updated by your package manager.
Optional: Download the current root hints file (the list of primary root servers which are serving the domain "." - the root domain). Update it roughly every six months. Note that this file changes infrequently. This is only necessary if you are not installing unbound from a package manager. If you do this optional step, you will need to uncomment the root-hints: configuration line in the suggested config file.
wget https://www.internic.net/domain/named.root -qO- | sudo tee /var/lib/unbound/root.hints
Configure unbound
Highlights:
- Listen only for queries from the local Pi-hole installation (on port 5335)
- Listen for both UDP and TCP requests
- Verify DNSSEC signatures, discarding BOGUS domains
- Apply a few security and privacy tricks
(Note that for some Red Hat based distros including CentOS up to v10, the path for the pi-hole.conf file may be /etc/unbound/conf.d/pi-hole.conf)
server:
    # If no logfile is specified, syslog is used
    # logfile: "/var/log/unbound/unbound.log"
    verbosity: 0

    interface: 127.0.0.1
    port: 5335
    do-ip4: yes
    do-udp: yes
    do-tcp: yes

    # May be set to no if you don't have IPv6 connectivity
    do-ip6: yes

    # You want to leave this to no unless you have *native* IPv6. With 6to4 and
    # Terredo tunnels your web browser should favor IPv4 for the same reasons
    prefer-ip6: no

    # Use this only when you downloaded the list of primary root servers!
    # If you use the default dns-root-data package, unbound will find it automatically
    #root-hints: "/var/lib/unbound/root.hints"

    # Trust glue only if it is within the server's authority
    harden-glue: yes

    # Require DNSSEC data for trust-anchored zones, if such data is absent, the zone becomes BOGUS
    harden-dnssec-stripped: yes

    # Don't use Capitalization randomization as it known to cause DNSSEC issues sometimes
    # see https://discourse.pi-hole.net/t/unbound-stubby-or-dnscrypt-proxy/9378 for further details
    use-caps-for-id: no

    # Reduce EDNS reassembly buffer size.
    # IP fragmentation is unreliable on the Internet today, and can cause
    # transmission failures when large DNS messages are sent via UDP. Even
    # when fragmentation does work, it may not be secure; it is theoretically
    # possible to spoof parts of a fragmented DNS message, without easy
    # detection at the receiving end. Recently, there was an excellent study
    # >>> Defragmenting DNS - Determining the optimal maximum UDP response size for DNS <<<
    # by Axel Koolhaas, and Tjeerd Slokker (https://indico.dns-oarc.net/event/36/contributions/776/)
    # in collaboration with NLnet Labs explored DNS using real world data from the
    # the RIPE Atlas probes and the researchers suggested different values for
    # IPv4 and IPv6 and in different scenarios. They advise that servers should
    # be configured to limit DNS messages sent over UDP to a size that will not
    # trigger fragmentation on typical network links. DNS servers can switch
    # from UDP to TCP when a DNS response is too big to fit in this limited
    # buffer size. This value has also been suggested in DNS Flag Day 2020.
    edns-buffer-size: 1232

    # Perform prefetching of close to expired message cache entries
    # This only applies to domains that have been frequently queried
    prefetch: yes

    # One thread should be sufficient, can be increased on beefy machines. In reality for most users running on small networks or on a single machine, it should be unnecessary to seek performance enhancement by increasing num-threads above 1.
    num-threads: 1

    # Ensure kernel buffer is large enough to not lose messages in traffic spikes
    so-rcvbuf: 1m

    # Ensure privacy of local IP ranges
    private-address: 192.168.0.0/16
    private-address: 169.254.0.0/16
    private-address: 172.16.0.0/12
    private-address: 10.0.0.0/8
    private-address: fd00::/8
    private-address: fe80::/10

    # Ensure no reverse queries to non-public IP ranges (RFC6303 4.2)
    private-address: 192.0.2.0/24
    private-address: 198.51.100.0/24
    private-address: 203.0.113.0/24
    private-address: 255.255.255.255/32
    private-address: 2001:db8::/32
Start your local recursive server and test that it's operational:
sudo service unbound restart
dig pi-hole.net @127.0.0.1 -p 5335
The first query may be quite slow, but subsequent queries, also to other domains under the same TLD, should be fairly quick.
Test validation
You can test DNSSEC validation using
dig fail01.dnssec.works @127.0.0.1 -p 5335
dig +ad dnssec.works @127.0.0.1 -p 5335
The first command should give a status report of SERVFAIL and no IP address. The second should give NOERROR plus an IP address in addition to a ad in the flags: section. The ad signifies (Authentic Data), indicating the DNS response has been authenticated and validated using DNSSEC.
Configure Pi-hole
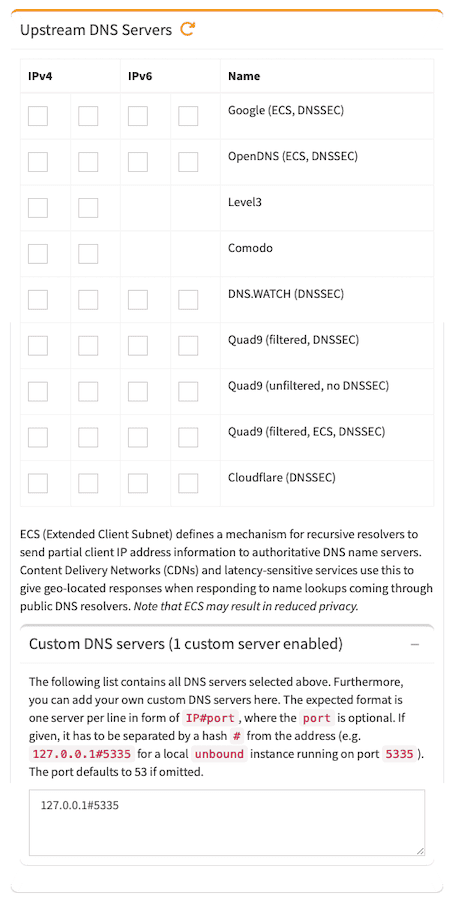
Finally, configure Pi-hole to use your recursive DNS server by specifying 127.0.0.1#5335 in the Settings > DNS > Custom DNS servers section and ensuring that all the other upstream servers are unticked, as shown below:
Don't forget to click on the Save & Apply button.
Disable resolvconf.conf entry for unbound (Required for Debian Bullseye+ releases)
Debian Bullseye+ releases auto-install a package called openresolv with a certain configuration that will cause unexpected behaviour for pihole and unbound. The effect is that the unbound-resolvconf.service instructs resolvconf to write unbound's own DNS service at nameserver 127.0.0.1 , but without the 5335 port, into the file /etc/resolv.conf. That /etc/resolv.conf file is used by local services/processes to determine DNS servers configured. You need to edit the configuration file and disable the service to work-around the misconfiguration.
Step 1 - Disable the Service
To check if this service is enabled for your distribution, run below one. It will show either active or inactive or it might not even be installed resulting in a could not be found message:
systemctl is-active unbound-resolvconf.service
To disable the service, run the statement below:
sudo systemctl disable --now unbound-resolvconf.service
Step 2 - Disable the file resolvconf_resolvers.conf
Disable the file resolvconf_resolvers.conf from being generated when resolvconf is invoked elsewhere.
sudo sed -Ei 's/^unbound_conf=/#unbound_conf=/' /etc/resolvconf.conf
sudo rm /etc/unbound/unbound.conf.d/resolvconf_resolvers.conf
Restart unbound.
sudo service unbound restart
Add logging to unbound
Warning
It's not recommended to increase verbosity for daily use, as unbound logs a lot. But it might be helpful for debugging purposes.
There are five levels of verbosity:
- Level 0 means no verbosity, only errors
- Level 1 gives operational information
- Level 2 gives detailed operational information
- Level 3 gives query level information
- Level 4 gives algorithm level information
- Level 5 logs client identification for cache misses
First, specify the log file, human-readable timestamps and the verbosity level in the server part of
/etc/unbound/unbound.conf.d/pi-hole.conf:
server:
    # If no logfile is specified, syslog is used
    logfile: "/var/log/unbound/unbound.log"
    log-time-ascii: yes
    verbosity: 1
Second, create log dir and file, set permissions:
sudo mkdir -p /var/log/unbound
sudo touch /var/log/unbound/unbound.log
sudo chown unbound /var/log/unbound/unbound.log
On modern Debian/Ubuntu-based Linux systems, you'll also have to add an AppArmor exception for this new file so unbound can write into it.
Create (or edit if existing) the file /etc/apparmor.d/local/usr.sbin.unbound and append
/var/log/unbound/unbound.log rw,
to the end (make sure this value is the same as above). Then reload AppArmor using
sudo apparmor_parser -r /etc/apparmor.d/usr.sbin.unbound
sudo service apparmor restart
Lastly, restart unbound:
sudo service unbound restart
Verifying that Pi-hole is querying unbound as its upstream
Query a dns using dig:
dig en.wikipedia.org @127.0.0.1
Then view Pi-hole's log file, follow a query seeing it sent to and receiving a reply from 127.0.0.1#5335 such as below:
sudo tail /var/log/pihole/pihole.log

Nov 24 11:57:47 dnsmasq[973]: query[A] en.wikipedia.org from 127.0.0.1
Nov 24 11:57:47 dnsmasq[973]: forwarded en.wikipedia.org to 127.0.0.1#5335
Nov 24 11:57:47 dnsmasq[973]: reply en.wikipedia.org is <CNAME>
Nov 24 11:57:47 dnsmasq[973]: reply dyna.wikimedia.org is 103.102.166.224
If you see the reply to queries from 127.0.0.1#5335, then Pi-hole is using unbound as its upstream.
Common Issues & Troubleshooting
Fix so-rcvbuf warning in unbound
The configuration in /etc/unbound/unbound.conf.d/pi-hole.conf sets the socket receive buffer size for incoming DNS queries to a higher-than-default value in order to handle high query rates:
so-rcvbuf: 1m
As a result, you may see this warning in unbound logs:
so-rcvbuf 1048576 was not granted. Got 425984. To fix: start with root permissions(linux) or sysctl bigger net.core.rmem_max(linux) or kern.ipc.maxsockbuf(bsd) values.
To fix it:
-
Check the current limit. This will show something like
net.core.rmem_max = 425984:sudo sysctl net.core.rmem_max -
Temporarily increase the limit to match unbound's request:
sudo sysctl -w net.core.rmem_max=1048576 -
Make it permanent. Edit
/etc/sysctl.d/99-unbound.conf(or on old systems eg Debian ≤ 12 edit/etc/sysctl.conf) and add or edit the line:net.core.rmem_max=1048576 -
Save and apply:
On up to date systems (eg Debian 13)
sudo systemctl restart systemd-sysctlOlder systems (eg Debian ≤ 12)
sudo sysctl -p -
Restart unbound:
sudo service unbound restart
Uninstall unbound
To remove unbound from your system run
sudo apt remove unbound
Make sure to switch to another upstream DNS server for Pi-hole.