Optional: Dual operation: LAN & VPN at the same time
OpenVPN is no longer recommended
We no longer recommend that you use OpenVPN for new deployments. Although OpenVPN has served us well in the past, we believe it's time to move towards more modern and efficient solutions.
We suggest that users now turn their attention to WireGuard, a forward-thinking VPN solution that offers better performance, faster speeds, and easier implementation. WireGuard has been designed with the latest technology in mind, providing simple yet powerful tools for securing your network communications. Pi-hole's step-by-step tutorial is designed to help you understand the ins and outs of WireGuard, regardless of your technical expertise.
Up until now, this wiki has been about a server set up on a cloud host, available on the public Internet. This section is aimed at a server set up in a private network like on a Raspberry Pi.
So if blocking works using eth0 but stops working for tun0, as described here, you may want to run this command pihole -a -i all, which should get the behavior you want by opening pihole-FTL up to listen on all ports. This is not recommended for cloud servers as they should not be listening on eth0.
If you want to set up your Pi-hole + OpenVPN such that you can use from both internal ((W)LAN) and external (VPN) networks, you have to apply some small changes. As an additional benefit, you will be able to reach all devices in the internal network (e.g. computers, networking-aware printers, etc.) through the VPN.
This setup assumes that your local network is in the range 192.168.2.0 (i.e. device addresses are in the range of 192.168.2.1 - 192.168.2.254). If this is not the case for you, you have to adjust the settings, accordingly, e.g.
- devices in 192.168.0.1 - 192.168.0.254 ->
route 192.168.0.0 - devices in 192.168.123.1 - 192.168.123.254 ->
route 192.168.123.0
Edit your /etc/openvpn/server/server.conf:
push "route 192.168.2.0 255.255.255.0"
push "dhcp-option DNS 192.168.2.123"
As you can see, we change the address of the DNS server to the local IP address of our Pi-hole (which is 192.168.2.123 in this example).
Afterward, we change the interface of Pi-hole to eth0 (your local network adapter instead of the VPN adapter tun0). This can conveniently be done by using pihole -r + Reconfigure.
After a restart of the OpenVPN server, all clients should be able to see all devices within your (at home) local network. This is an example running on a distant server, which is connected through the VPN and can successfully communicate with all internal devices:
me@client ~ $ ifconfig
eth0      Link encap:Ethernet  HWaddr e0:xx:xx:xx:xx:xx
          inet addr:134.x.x.x  Bcast:134.x.x.x  Mask:255.x.x.x
          inet6 addr: X:X:X:X::X/64 Scope:Link
          UP BROADCAST RUNNING MULTICAST  MTU:1500  Metric:1
          RX packets:3623911 errors:0 dropped:0 overruns:0 frame:0
          TX packets:2803670 errors:0 dropped:0 overruns:0 carrier:0
          collisions:0 txqueuelen:1000
          RX bytes:1921375471 (1.9 GB)  TX bytes:1227835028 (1.2 GB)

lo        Link encap:Local Loopback
          inet addr:127.0.0.1  Mask:255.0.0.0
          inet6 addr: ::1/128 Scope:Host
          UP LOOPBACK RUNNING  MTU:65536  Metric:1
          RX packets:553426 errors:0 dropped:0 overruns:0 frame:0
          TX packets:553426 errors:0 dropped:0 overruns:0 carrier:0
          collisions:0 txqueuelen:1
          RX bytes:113417383 (113.4 MB)  TX bytes:113417383 (113.4 MB)

tun0      Link encap:UNSPEC  HWaddr 00-00-00-00-00-00-00-00-00-00-00-00-00-00-00-00
          inet addr:10.8.0.2  P-t-P:10.8.0.2  Mask:255.255.255.0
          UP POINTOPOINT RUNNING NOARP MULTICAST  MTU:1500  Metric:1
          RX packets:274676 errors:0 dropped:0 overruns:0 frame:0
          TX packets:331178 errors:0 dropped:0 overruns:0 carrier:0
          collisions:0 txqueuelen:100
          RX bytes:43745313 (43.7 MB)  TX bytes:43956250 (43.9 MB)

me@client ~ $ ping 192.168.2.123
PING 192.168.2.123 (192.168.2.123) 56(84) bytes of data.
64 bytes from 192.168.2.123: icmp_seq=1 ttl=64 time=18.9 ms
64 bytes from 192.168.2.123: icmp_seq=2 ttl=64 time=18.9 ms
64 bytes from 192.168.2.123: icmp_seq=3 ttl=64 time=18.9 ms
64 bytes from 192.168.2.123: icmp_seq=4 ttl=64 time=18.7 ms
64 bytes from 192.168.2.123: icmp_seq=5 ttl=64 time=18.7 ms
64 bytes from 192.168.2.123: icmp_seq=6 ttl=64 time=19.0 ms
^C
--- 192.168.2.123 ping statistics ---
6 packets transmitted, 6 received, 0% packet loss, time 5007ms
rtt min/avg/max/mdev = 18.740/18.894/19.017/0.189 ms
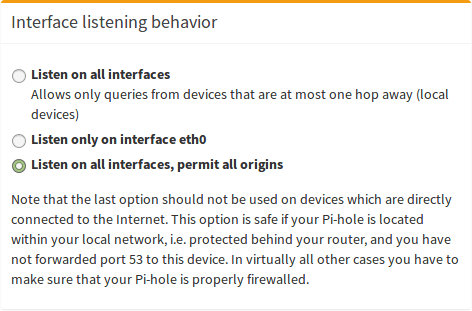
Important last step
The undocumented pihole -a -i all command is simply what runs when you choose Listen on all interfaces, permit all origins (make sure your Pi-hole is firewalled), which if you've read this far in the tutorial, you should understand that we don't want you to knowingly or unknowing set up an open resolver.